在一次项目开发中,使用到了Netty 网络应用框架,以及 MQTT 进行消息数据的收发,这其中需要后台来将获取到的消息主动推送给前端,于是就使用到了MQTT,特此记录一下。
一、什么是websocket?
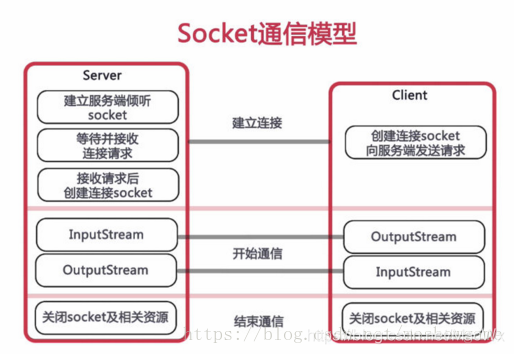
WebSocket 协议是基于 TCP 的一种新的网络协议。
它实现了客户端与服务器之间的全双工通信,学过计算机网络都知道,既然是全双工,就说明了服务器可以主动发送信息给客户端。
这与我们的推送技术或者是多人在线聊天的功能不谋而合。
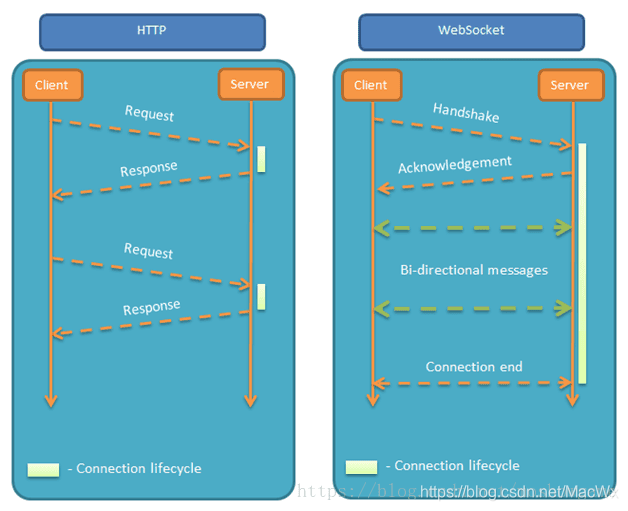
为什么不使用 HTTP 协议呢?
这是因为HTTP是单工通信,通信只能由客户端发起,客户端请求一下,服务器处理一下,这就太麻烦了。
于是 websocket 应运而生。
下面我们就直接开始使用 Spring Boot 开始整合。以下案例都在我自己的电脑上测试成功,你可以根据自己的功能进行修改即可。
我的项目结构如下:

二、使用步骤
1.添加依赖
Maven 依赖:
1
2
3
4
| <dependency>
<groupId>org.springframework.boot</groupId>
<artifactId>spring-boot-starter-websocket</artifactId>
</dependency>
|
2.启用Springboot对WebSocket的支持
启用 WebSocket 的支持也是很简单,几句代码搞定。
1
2
3
4
5
6
7
8
9
10
11
12
13
14
15
| import org.springframework.context.annotation.Bean;
import org.springframework.context.annotation.Configuration;
import org.springframework.web.socket.server.standard.ServerEndpointExporter;
@Configuration
public class WebSocketConfig {
@Bean
public ServerEndpointExporter serverEndpointExporter() {
return new ServerEndpointExporter();
}
}
|
3.核心配置:WebSocketServer
因为 Web Socket 是类似客户端服务端的形式(采用 ws 协议),那么这里的 WebSocketServer 其实就相当于一个 ws 协议的 Controller。另外关注微信公众号码猿技术专栏,回复关键词9527,送你一份Sprign Cloud Alibaba实战视频教程!
@ServerEndpoint 注解这是一个类层次的注解,它的功能主要是将目前的类定义成一个 websocket 服务器端。注解的值将被用于监听用户连接的终端访问 URL 地址,客户端可以通过这个 URL 来连接到 WebSocket 服务器端
再新建一个 ConcurrentHashMap webSocketMap 用于接收当前 userId 的 WebSocket,方便传递之间对 userId 进行推送消息。
下面是具体业务代码:
1
2
3
4
5
6
7
8
9
10
11
12
13
14
15
16
17
18
19
20
21
22
23
24
25
26
27
28
29
30
31
32
33
34
35
36
37
38
39
40
41
42
43
44
45
46
47
48
49
50
51
52
53
54
55
56
57
58
59
60
61
62
63
64
65
66
67
68
69
70
71
72
73
74
75
76
77
78
79
80
81
82
83
84
85
86
87
88
89
90
91
92
93
94
95
96
97
98
99
100
101
102
103
104
105
106
107
108
109
110
111
112
113
114
115
116
117
118
119
120
121
122
123
124
125
126
127
128
129
130
131
132
133
134
135
136
137
138
139
140
| package cc.mrbird.febs.external.webScoket;
import com.baomidou.mybatisplus.core.conditions.query.QueryWrapper;
import com.baomidou.mybatisplus.core.conditions.update.UpdateWrapper;
import lombok.extern.slf4j.Slf4j;
import org.springframework.stereotype.Component;
import org.springframework.stereotype.Service;
import javax.websocket.*;
import javax.websocket.server.PathParam;
import javax.websocket.server.ServerEndpoint;
import java.io.IOException;
import java.time.LocalDateTime;
import java.util.List;
import java.util.concurrent.CopyOnWriteArraySet;
@Component
@Slf4j
@Service
@ServerEndpoint("/api/websocket/{sid}")
public class WebSocketServer {
private static int onlineCount = 0;
private static CopyOnWriteArraySet<WebSocketServer> webSocketSet = new CopyOnWriteArraySet<WebSocketServer>();
private Session session;
private String sid = "";
@OnOpen
public void onOpen(Session session, @PathParam("sid") String sid) {
this.session = session;
webSocketSet.add(this);
this.sid = sid;
addOnlineCount();
try {
sendMessage("conn_success");
log.info("有新窗口开始监听:" + sid + ",当前在线人数为:" + getOnlineCount());
} catch (IOException e) {
log.error("websocket IO Exception");
}
}
@OnClose
public void onClose() {
webSocketSet.remove(this);
subOnlineCount();
log.info("释放的sid为:"+sid);
log.info("有一连接关闭!当前在线人数为" + getOnlineCount());
}
@OnMessage
public void onMessage(String message, Session session) {
log.info("收到来自窗口" + sid + "的信息:" + message);
for (WebSocketServer item : webSocketSet) {
try {
item.sendMessage(message);
} catch (IOException e) {
e.printStackTrace();
}
}
}
@OnError
public void onError(Session session, Throwable error) {
log.error("发生错误");
error.printStackTrace();
}
public void sendMessage(String message) throws IOException {
this.session.getBasicRemote().sendText(message);
}
public static void sendInfo(String message, @PathParam("sid") String sid) throws IOException {
log.info("推送消息到窗口" + sid + ",推送内容:" + message);
for (WebSocketServer item : webSocketSet) {
try {
if (sid == null) {
} else if (item.sid.equals(sid)) {
item.sendMessage(message);
}
} catch (IOException e) {
continue;
}
}
}
public static synchronized int getOnlineCount() {
return onlineCount;
}
public static synchronized void addOnlineCount() {
WebSocketServer.onlineCount++;
}
public static synchronized void subOnlineCount() {
WebSocketServer.onlineCount--;
}
public static CopyOnWriteArraySet<WebSocketServer> getWebSocketSet() {
return webSocketSet;
}
}
|
4.测试Controller
1
2
3
4
5
6
7
8
9
10
11
12
13
14
15
16
17
18
19
20
21
22
23
24
25
26
27
28
29
30
31
32
33
34
35
36
37
38
39
40
41
42
43
44
| import org.springframework.stereotype.Controller;
import org.springframework.web.bind.annotation.GetMapping;
import org.springframework.web.bind.annotation.PathVariable;
import org.springframework.web.bind.annotation.RequestMapping;
import org.springframework.web.bind.annotation.ResponseBody;
import org.springframework.web.servlet.ModelAndView;
import java.io.IOException;
import java.util.HashMap;
import java.util.Map;
@Controller("web_Scoket_system")
@RequestMapping("/api/socket")
public class SystemController {
@GetMapping("/index/{userId}")
public ModelAndView socket(@PathVariable String userId) {
ModelAndView mav = new ModelAndView("/socket1");
mav.addObject("userId", userId);
return mav;
}
@ResponseBody
@RequestMapping("/socket/push/{cid}")
public Map pushToWeb(@PathVariable String cid, String message) {
Map<String,Object> result = new HashMap<>();
try {
WebSocketServer.sendInfo(message, cid);
result.put("code", cid);
result.put("msg", message);
} catch (IOException e) {
e.printStackTrace();
}
return result;
}
}
|
5.测试页面index.html
1
2
3
4
5
6
7
8
9
10
11
12
13
14
15
16
17
18
19
20
21
22
23
24
25
26
27
28
29
30
31
32
33
34
35
36
37
38
39
40
41
42
43
44
45
46
47
48
49
50
51
52
53
54
55
56
57
58
59
60
61
62
63
64
65
66
67
68
69
70
71
72
73
| <!DOCTYPE html>
<html>
<head>
<meta charset="utf-8">
<title>Java 后端 WebSocket 的 Tomcat 实现</title>
<script type="text/javascript" src="js/jquery.min.js"></script>
</head>
<body>
<div id="main" style="width: 1200px;height:800px;"></div>
Welcome<br/><input id="text" type="text" />
<button onclick="send()">发送消息</button>
<hr/>
<button onclick="closeWebSocket()">关闭WebSocket连接</button>
<hr/>
<div id="message"></div>
</body>
<script type="text/javascript">
var websocket = null;
if('WebSocket' in window) {
websocket = new WebSocket("ws://192.168.100.196:8082/api/websocket/100");
} else {
alert('当前浏览器 Not support websocket')
}
websocket.onerror = function() {
setMessageInnerHTML("WebSocket连接发生错误");
};
websocket.onopen = function() {
setMessageInnerHTML("WebSocket连接成功");
}
var U01data, Uidata, Usdata
websocket.onmessage = function(event) {
console.log(event);
setMessageInnerHTML(event);
setechart()
}
websocket.onclose = function() {
setMessageInnerHTML("WebSocket连接关闭");
}
window.onbeforeunload = function() {
closeWebSocket();
}
function setMessageInnerHTML(innerHTML) {
document.getElementById('message').innerHTML += innerHTML + '<br/>';
}
function closeWebSocket() {
websocket.close();
}
function send() {
var message = document.getElementById('text').value;
websocket.send('{"msg":"' + message + '"}');
setMessageInnerHTML(message + " ");
}
</script>
</html>
|
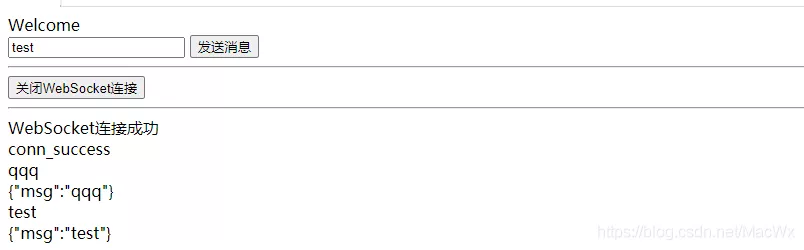
6.结果展示
后台:
如果有连接请求

前台显示:
总结
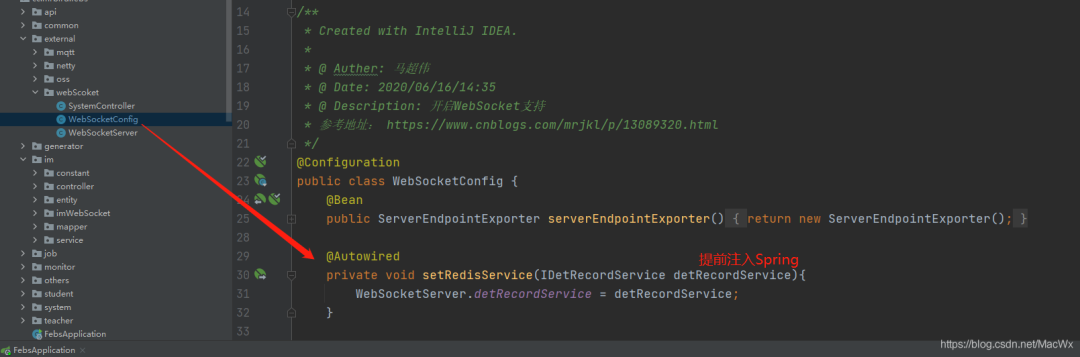
这中间我遇到一个问题,就是说 WebSocket 启动的时候优先于 spring 容器,从而导致在 WebSocketServer 中调用业务Service会报空指针异常。
所以需要在 WebSocketServer 中将所需要用到的 service 给静态初始化一下:
如图所示:
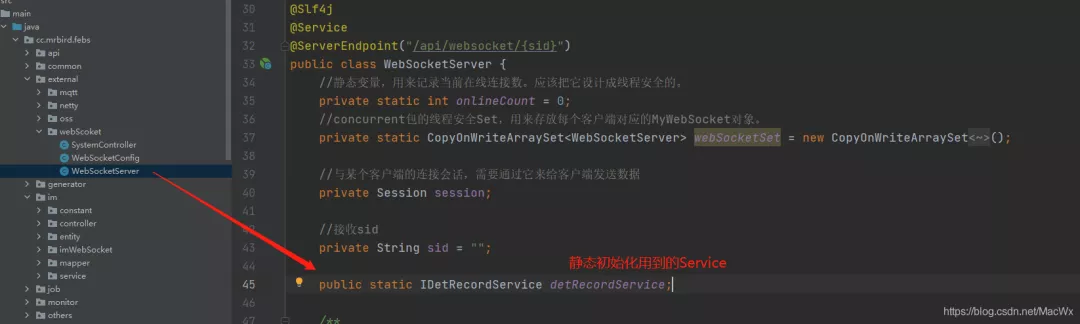
还需要做如下配置: