前言 最近频繁被Swagger 3.0刷屏,官方表示这是一个突破性的变更,有很多的亮点,我还真不太相信,今天来带大家尝尝鲜,看看这碗汤到底鲜不鲜….
官方文档如何说? 该项目开源在Github上,地址:https://github.com/springfox/springfox 。
Swagger 3.0有何改动?官方文档总结如下几点:
删除了对springfox-swagger2的依赖
删除所有@EnableSwagger2...注解
添加了springfox-boot-starter依赖项
移除了guava等第三方依赖
文档访问地址改变了,改成了http://ip:port/project/swagger-ui/index.html。
姑且看到这里,各位初始感觉如何?
既然人家更新出来了,咱不能不捧场,下面就介绍下Spring Boot如何整合Swagger 3.0吧。
Spring Boot版本说明 作者使用Spring Boot的版本是2.3.5.RELEASE
添加依赖 Swagger 3.0已经有了与Spring Boot整合的启动器,只需要添加以下依赖:
1 2 3 4 5 <dependency > <groupId > io.springfox</groupId > <artifactId > springfox-boot-starter</artifactId > <version > 3.0.0</version > </dependency >
springfox-boot-starter做了什么? Swagger 3.0主推的一大特色就是这个启动器,那么这个启动器做了什么呢?
记住 :启动器的一切逻辑都在自动配置类中。
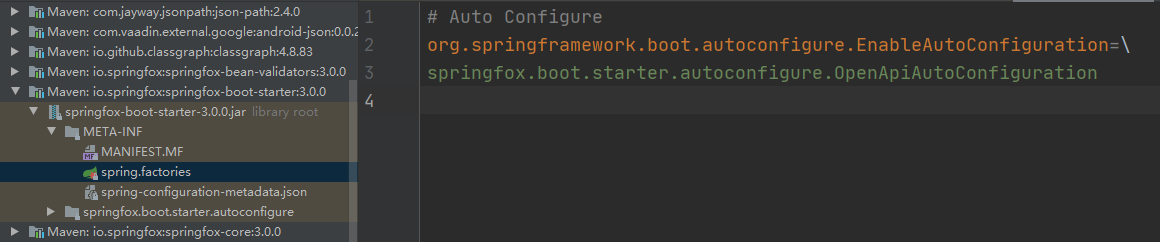
找到springfox-boot-starter的自动配置类,在/META-INF/spring.factories文件中,如下:
从上图可以知道,自动配置类就是OpenApiAutoConfiguration,源码如下:
1
2
3
4
5
6
7
8
9
10
11
12
13
14
15
16
@Configuration @EnableConfigurationProperties(SpringfoxConfigurationProperties.class) @ConditionalOnProperty(value = "springfox.documentation.enabled", havingValue = "true", matchIfMissing = true) @Import({ OpenApiDocumentationConfiguration.class, SpringDataRestConfiguration.class, BeanValidatorPluginsConfiguration.class, Swagger2DocumentationConfiguration.class, SwaggerUiWebFluxConfiguration.class, SwaggerUiWebMvcConfiguration.class }) @AutoConfigureAfter({ WebMvcAutoConfiguration.class, JacksonAutoConfiguration.class, HttpMessageConvertersAutoConfiguration.class, RepositoryRestMvcAutoConfiguration.class }) public class OpenApiAutoConfiguration }
敢情这个自动配置类啥也没干,就光导入了几个配置类(@Import)以及开启了属性配置(@EnableConfigurationProperties)。
重点 :记住OpenApiDocumentationConfiguration这个配置类,初步看来这是个BUG,本人也不想深入,里面的代码写的实在拙劣,注释都不写。
撸起袖子就是干? 说真的,还是和以前一样,真的没什么太大的改变,按照文档的步骤一步步来。
定制一个基本的文档示例 一切的东西还是需要配置类手动配置,说真的,我以为会在全局配置文件中自己配置就行了。哎,想多了。配置类如下:
1
2
3
4
5
6
7
8
9
10
11
12
13
14
15
16
17
18
19
20
21
22
23
24
25
26
27
28
29
30
31
32
33
34
35
36
37
38
@EnableOpenApi @Configuration @EnableConfigurationProperties(value = {SwaggerProperties.class}) public class SwaggerConfig @Autowired private SwaggerProperties properties; @Bean public Docket frontApi () return new Docket(DocumentationType.OAS_30) .enable(properties.getFront().getEnable()) .groupName(properties.getFront().getGroupName()) .apiInfo(frontApiInfo()) .select() .apis(RequestHandlerSelectors.basePackage(properties.getFront().getBasePackage())) .paths(PathSelectors.any()) .build(); } private ApiInfo frontApiInfo () return new ApiInfoBuilder() .title(properties.getFront().getTitle()) .description(properties.getFront().getDescription()) .version(properties.getFront().getVersion()) .contact( new Contact(properties.getFront().getContactName(), properties.getFront().getContactUrl(), properties.getFront().getContactEmail())) .build(); } }
@EnableOpenApi这个注解文档解释如下:
1
2
3
Indicates that Swagger support should be enabled. This should be applied to a Spring java config and should have an accompanying '@Configuration' annotation. Loads all required beans defined in @see SpringSwaggerConfig
什么意思呢?大致意思就是只有在配置类标注了@EnableOpenApi这个注解才会生成Swagger文档 。
@EnableConfigurationProperties这个注解使开启自定义的属性配置,这是作者自定义的Swagger配置。
总之还是和之前一样配置,根据官方文档要求,需要在配置类上加一个@EnableOpenApi注解。
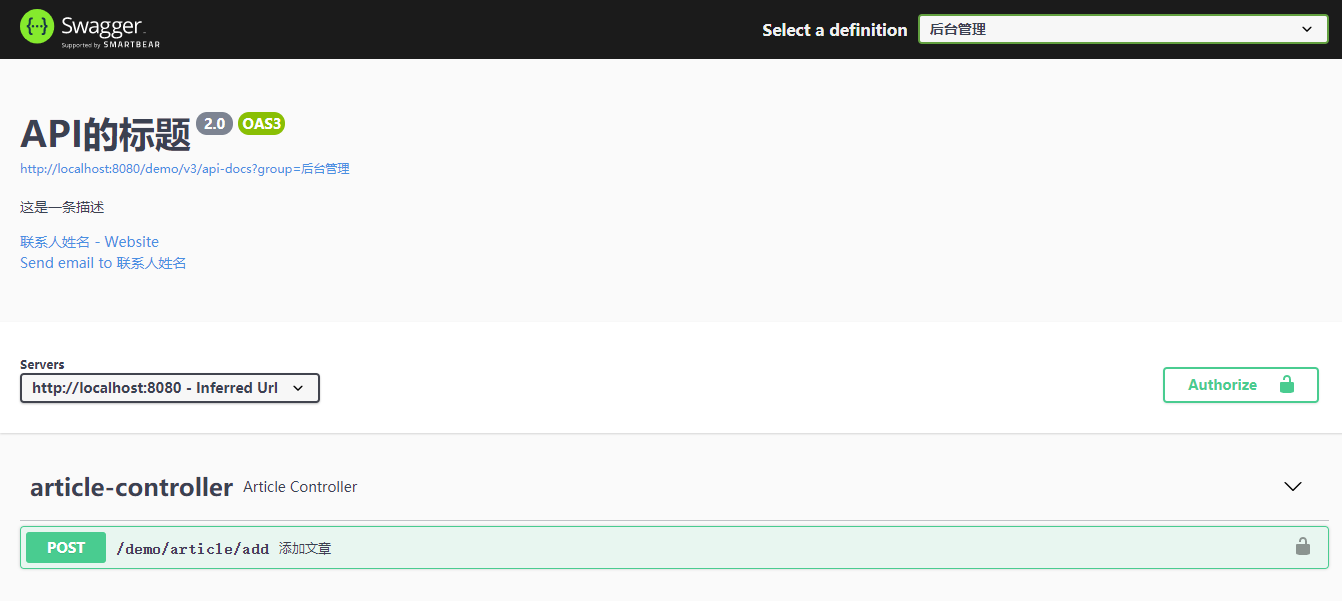
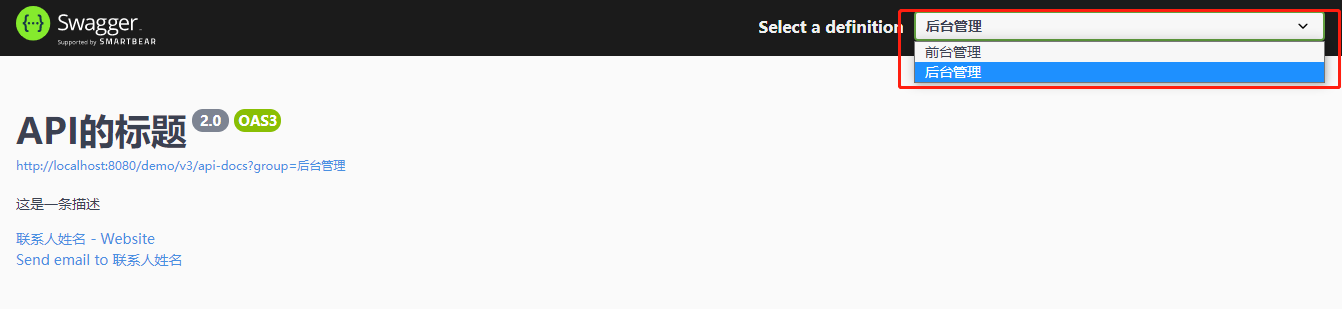
文档如何分组? 我们都知道,一个项目可能分为前台,后台,APP端,小程序端…..每个端的接口可能还相同,不可能全部放在一起吧,肯定是要区分开的。
因此,实际开发中文档肯定是要分组的。
分组其实很简单,Swagger向IOC中注入一个Docket即为一个组的文档,其中有个groupName()方法指定分组的名称。
因此只需要注入多个Docket指定不同的组名即可,当然,这些文档的标题、描述、扫描的路径都是可以不同定制的。
如下配置两个Docket,分为前台和后台,配置类如下:
1
2
3
4
5
6
7
8
9
10
11
12
13
14
15
16
17
18
19
20
21
22
23
24
25
26
27
28
29
30
31
32
33
34
35
36
37
38
39
40
41
42
43
44
45
46
47
48
49
50
51
52
53
54
55
56
57
58
59
60
61
62
63
64
65
66
67
68
69
@EnableOpenApi @Configuration @EnableConfigurationProperties(value = {SwaggerProperties.class}) public class SwaggerConfig @Autowired private SwaggerProperties properties; @Bean public Docket frontApi () return new Docket(DocumentationType.OAS_30) .enable(properties.getFront().getEnable()) .groupName(properties.getFront().getGroupName()) .apiInfo(frontApiInfo()) .select() .apis(RequestHandlerSelectors.basePackage(properties.getFront().getBasePackage())) .paths(PathSelectors.any()) .build(); } private ApiInfo frontApiInfo () return new ApiInfoBuilder() .title(properties.getFront().getTitle()) .description(properties.getFront().getDescription()) .version(properties.getFront().getVersion()) .contact( new Contact(properties.getFront().getContactName(), properties.getFront().getContactUrl(), properties.getFront().getContactEmail())) .build(); } @Bean public Docket backApi () return new Docket(DocumentationType.OAS_30) .enable(properties.getBack().getEnable()) .groupName("后台管理" ) .apiInfo(backApiInfo()) .select() .apis(RequestHandlerSelectors.basePackage(properties.getBack().getBasePackage())) .paths(PathSelectors.any()) .build(); } private ApiInfo backApiInfo () return new ApiInfoBuilder() .title(properties.getBack().getTitle()) .description(properties.getBack().getDescription()) .version(properties.getBack().getVersion()) .contact( new Contact(properties.getBack().getContactName(), properties.getBack().getContactUrl(), properties.getBack().getContactEmail())) .build(); } }
属性配置文件SwaggerProperties如下,分为前台和后台两个不同属性的配置:
1 2 3 4 5 6 7 8 9 10 11 12 13 14 15 16 17 18 19 20 21 22 23 24 25 26 27 28 29 30 @ConfigurationProperties(prefix = "spring.swagger") @Data public class SwaggerProperties private SwaggerEntity front; private SwaggerEntity back; @Data public static class SwaggerEntity private String groupName; private String basePackage; private String title; private String description; private String contactName; private String contactEmail; private String contactUrl; private String version; private Boolean enable; } }
此时的文档截图如下,可以看到有了两个不同的分组:
如何添加授权信息? 现在项目API肯定都需要权限认证,否则不能访问,比如请求携带一个TOKEN。
在Swagger中也是可以配置认证信息,这样在每次请求将会默认携带上。
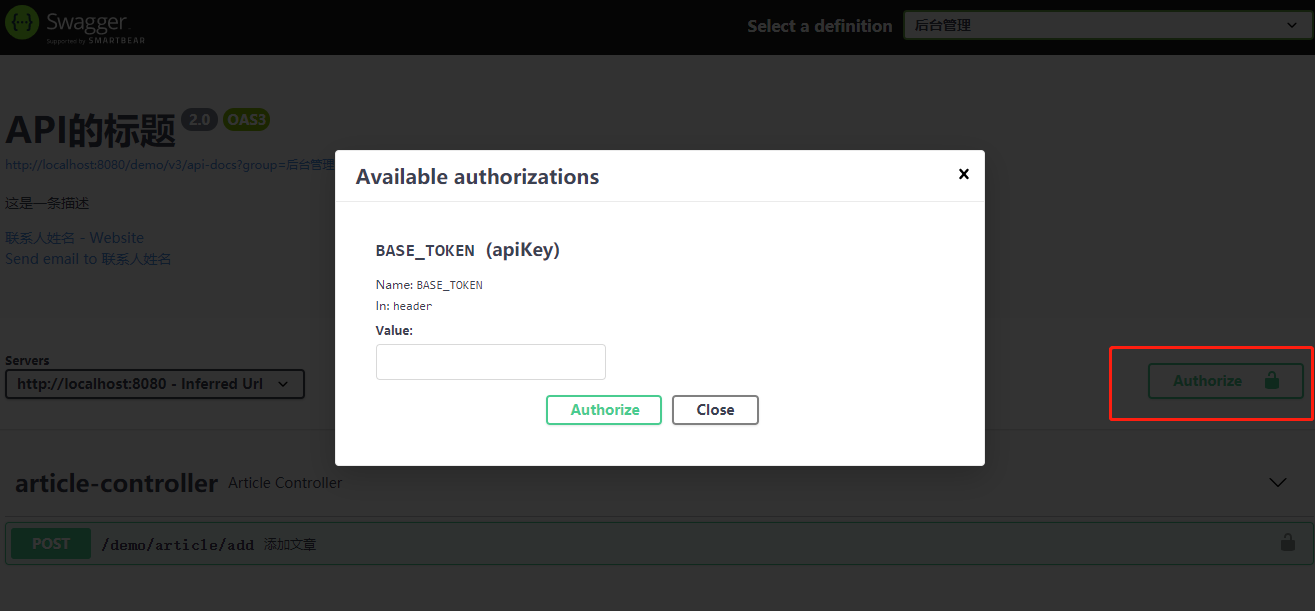
在Docket中有如下两个方法指定授权信息,分别是securitySchemes()和securityContexts()。在配置类中的配置如下,在构建Docket的时候设置进去即可:
1
2
3
4
5
6
7
8
9
10
11
12
13
14
15
16
17
18
19
20
21
22
23
24
25
26
27
28
29
30
31
32
33
34
35
36
37
38
39
40
41
42
@Bean public Docket frontApi () RequestParameter parameter = new RequestParameterBuilder() .name("platform" ) .description("请求头" ) .in(ParameterType.HEADER) .required(true ) .build(); List<RequestParameter> parameters = Collections.singletonList(parameter); return new Docket(DocumentationType.OAS_30) .enable(properties.getFront().getEnable()) .groupName(properties.getFront().getGroupName()) .apiInfo(frontApiInfo()) .select() .apis(RequestHandlerSelectors.basePackage(properties.getFront().getBasePackage())) .paths(PathSelectors.any()) .build() .securitySchemes(securitySchemes()) .securityContexts(securityContexts()); } private List<SecurityScheme> securitySchemes () ApiKey apiKey = new ApiKey("BASE_TOKEN" , "token" , In.HEADER.toValue()); return Collections.singletonList(apiKey); } private List<SecurityContext> securityContexts () return Collections.singletonList( SecurityContext.builder() .securityReferences(Collections.singletonList(new SecurityReference("BASE_TOKEN" , new AuthorizationScope[]{new AuthorizationScope("global" , "" )}))) .build() ); }
以上配置成功后,在Swagger文档的页面中将会有Authorize按钮,只需要将请求头添加进去即可。如下图:
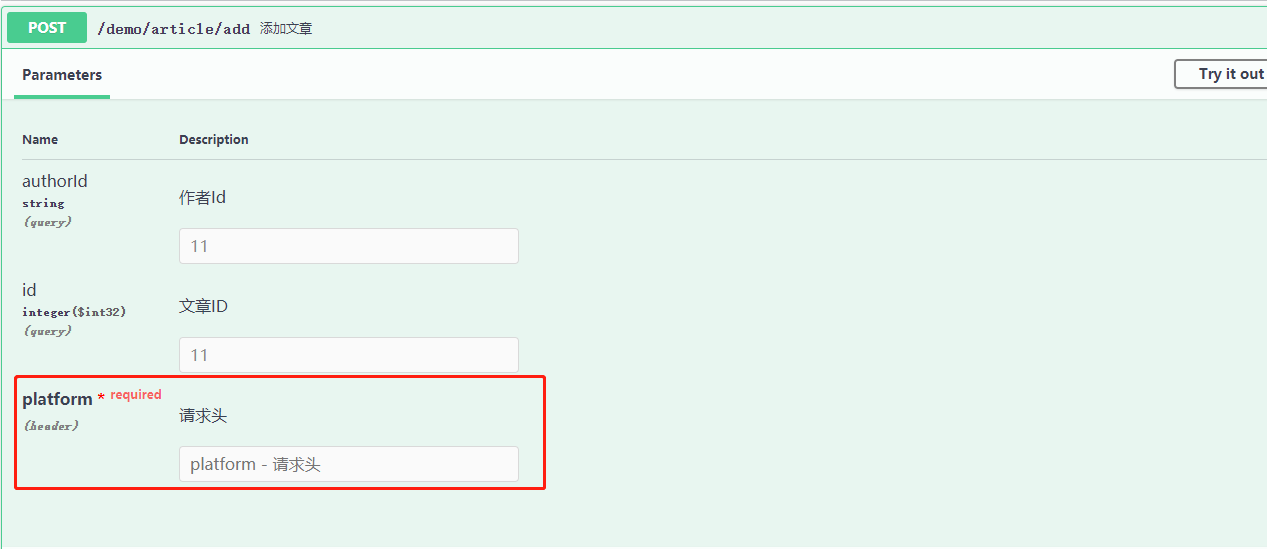
如何携带公共的请求参数? 不同的架构可能发请求的时候除了携带TOKEN,还会携带不同的参数,比如请求的平台,版本等等,这些每个请求都要携带的参数称之为公共参数。
那么如何在Swagger中定义公共的参数呢?比如在请求头中携带。
在Docket中的方法globalRequestParameters()可以设置公共的请求参数,接收的参数是一个List<RequestParameter>,因此只需要构建一个RequestParameter集合即可,如下:
1
2
3
4
5
6
7
8
9
10
11
12
13
14
15
16
17
18
19
20
@Bean public Docket frontApi () RequestParameter parameter = new RequestParameterBuilder() .name("platform" ) .description("请求的平台" ) .in(ParameterType.HEADER) .required(true ) .build(); List<RequestParameter> parameters = Collections.singletonList(parameter); return new Docket(DocumentationType.OAS_30) ..... .build() .globalRequestParameters(parameters); }
以上配置完成,将会在每个接口中看到一个请求头,如下图:
粗略是一个BUG 作者在介绍自动配置类的时候提到了一嘴,现在来简单分析下。
OpenApiAutoConfiguration这个自动配置类中已经导入OpenApiDocumentationConfiguration这个配置类,如下一段代码:
1
2
3
4
@Import({ OpenApiDocumentationConfiguration.class, ...... })
@EnableOpenApi的源码如下:
1
2
3
4
5
6
@Retention(value = java.lang.annotation.RetentionPolicy.RUNTIME) @Target(value = {java.lang.annotation.ElementType.TYPE}) @Documented @Import(OpenApiDocumentationConfiguration.class) public @interface EnableOpenApi {}
从源码可以看出:@EnableOpenApi这个注解的作用就是导入OpenApiDocumentationConfiguration这个配置类,纳尼???
既然已经在自动配置类OpenApiAutoConfiguration导入了,那么无论需不需要在配置类上标注@EnableOpenApi注解不都会开启Swagger支持吗?
测试一下 :不在配置类上标注@EnableOpenApi这个注解,看看是否Swagger运行正常。结果在意料之中,还是能够正常运行。
总结 :作者只是大致分析了下,这可能是个BUG亦或是后续有其他的目的,至于结果如此,不想验证了,没什么意思。
总结 这篇文章也是尝了个鲜,个人感觉不太香,有点失望。你喜欢吗?
Spring Boot 整合的源码已经上传,需要的朋友回复关键词Swagger3.0 获取。
另外作者的第一本PDF书籍已经整理好了,由浅入深的详细介绍了Mybatis基础以及底层源码,有需要的朋友公众号回复关键词Mybatis进阶 即可获取,目录如下: